Databases
Choice of database: MySQL 5.6.4+ or PostgreSQL
SerialOrder uses SQLAlchemy to talk to databases. This permits a wide variety of back-end databases. However, some additional constraints apply. These are:
We want lots of task instances to be able to use the same database, because that helps analysis enormously.
We want to use a freely available database engine.
Use of a lightweight database like SQLite poses some problems if many tasks are writing to the same database at once [1], as SQLite locks the whole database when writing. This might cause problems if many tasks are writing events at high speed to the database – but it also prohibits one task editing a config (with an SQLite transaction active) while other tasks write. That’s a very common situation, which argues strongly for a formal client/server database.
In addition, we want to store timestamps to at least millisecond accuracy. There are a variety of ways of doing this, with and without timezone storage. The only entirely consistent way across databases is to use a textual format (e.g. ISO-8601, such as
2016-03-02T22:43:03.710817+01:00or an equivalent with less punctuation). However, this reduces the ability to perform simple arithmetic. For the purposes of behavioural tasks, time differences (latencies) are important, and timezones aren’t, so we can use a high-precision UTC date/time. This gives us theDATETIME(6)type in MySQL 5.6.4+ (which has microsecond accuracy), or theTIMESTAMPtype in PostgreSQL. (For more detail, see Dates and times.)
Installing PostgreSQL
To choose between MySQL and PostgreSQL, let’s compare quick installation and startup, using an old Windows version (Windows XP, 32-bit). First PostgreSQL 9.5:
Installation under Windows XP. Simple. The default port is 5432, and the default superuser account is
postgres. You can specify your data directory as you install, so it’s probably worth putting this somewhere outsideC:\Program Files, such asc:\postgresql_data.Running something. Using fails to connect with supplied defaults [2]. If you use a short [3] or full [4] command line version, it does work, so this indicates a bug in
runpsql.bat[5]. Once at the SQL command line, you can use thehelpcommand, providing you are at thepostgres=#(command start) prompt not thepostgres-#(command continuation) prompt. The GUI administrator works better out of the box: .Creating a user. Within the GUI administrator, double-click on the local server to connect. Right-click “Login Roles” to choose “New Login Role…”. Create a user, giving it a name (e.g. ‘researcher’) in the Properties tab and a password in the Definition tab. Don’t forget the password, or you won’t be able to connect with this user from the
psqltool [6].Creating a database. Within the GUI administrator as before, right-click “Databases” to choose “New Database…”. Give it a name (e.g. serialorder) and assign one of your users as its owner.
Installation of PostgreSQL under Ubuntu is also easy [7].
Installing MySQL
Then MySQL 5.7.1:
Installation under Windows XP. In short, don’t use this OS. Failure details are below.
Installation of Microsoft .NET 4.0 is a prerequisite, and this is easy. Installation of MySQL itself is easy [8]. However, the web community installer (1.6 Mb download) failed miserably. The installer failed to start the server. The MySQL57 service reports that it isn’t a Win32 program when you try to run it. The full community installer (377.9 Mb download) failed. MySQL Workbench failed to install; in the depths of the very long log, it said “The operating system is not adequate for running MySQL Workbench 6.3 CE. You need Windows 7 or newer and .Net 4.0 Client Profile installed.” Then the installer crashed, saying “This class is designed only for Windows Vista and higher.” (At least the error messages are better with this installer!)
Installation under Windows 10. Much better.
Prerequisite: Visual C++ Redistributable Packages for Visual Studio 2013 [9], which you’ll want in order to get MySQL Workbench installed.
Prerequisite: Python 3.4 [10], for MySQL Connector/Python.
The web installer works fine here. Choosing the defaults works well, and you can add additional users during setup. The default port is 3306, and the default superuser account is
root.
Creating a user. You might have already done this during installation, as above. If not, run MySQL Workbench, click USERS AND PRIVILEGES, then “Add Account”. Specify the details and click “Apply”.
Creating a database. Run MySQL Workbench. Under SCHEMAS, right-click one and click “Create schema…” Give the new schema (database) a name and click “Apply”, then “Apply” again to confirm.
So either is perfectly reasonable.
Installing MySQL under Ubuntu is also easy [11].
Suggestion
I suggest MySQL, but only because I’ve used it more.
Telling SerialOrder which database to use: the database URL
If your database is called ‘serialorder’, your database user is ‘researcher’ and their password is ‘blueberry’, then you can use an environment variable or a command-line switch to tell the task how to connect with the database, like this:
Database |
Environment |
Method |
|---|---|---|
PostgreSQL |
Linux, environment variable |
$ export WHISKER_SERIAL_ORDER_DB_URL=postgresql://researcher:blueberry@localhost/serialorder$ whisker_serial_order |
PostgreSQL |
Any OS, command-line switch |
|
MySQL |
Linux, environment variable |
$ export WHISKER_SERIAL_ORDER_DB_URL=mysql://researcher:blueberry@localhost/serialorder$ whisker_serial_order |
MySQL |
Any OS, command-line switch |
|
Any |
Windows, environment variable |
Use the |
Advice on analysis using the database, focusing on MySQL
MySQL Workbench is pretty good, and free.
Start it, then connect to your MySQL instance.
You can then open a query window. To get going, presuming your database is called serialorder, you can use the commands:
USE serialorder;
SELECT * FROM session;
… and click the lightning symbol to run the query.
To copy/paste results, click in the output and then use Ctrl-A to select all rows and Ctrl-C to copy. It should paste right into spreadsheets (using commas to delimit cells and apostrophes to delimit text). If you select rows using Ctrl-A or shift-click, then the right mouse button offers more copy/paste options.
To make your query a permanent part of the database, you can create it as a view.
A number of views are pre-created for you. Their names contain ‘view’. You’ll find them by exploring the SCHEMAS list (e.g. ). Similarly, you can explore the tables directly like this (); right-click a table and choose “Select Rows” to see the raw data.
Avoid editing data in the database. It carries a significant risk of
problems. There are few situations it would be wise. Use is only for experts.
The only realistic use-case is if you entered a wrong subject name and failed
to notice as you were starting the session; you are then probably looking for
the SQL syntax UPDATE config SET subject='newname' WHERE id=XXX;, where
XXX is the ID number of the record you have determined to be faulty. You can
also edit cells directly from the Table view in MySQL Workbench (right-click
the cell and choose “Open Value in Editor”).
Instead, add new tables. Suppose, for example, that you have information about session numbers, or group membership (sham or lesion?), or drug manipulation prior to the session. You should create a new table, store the linking information, and link dynamically to produce your queries. Here’s a made-up example:
-- This is an SQL comment. We will create some tables:

CREATE TABLE lesion (
    -- This table tells us which subjects have what lesion.
    -- Suppose a subject can only ever be in one lesion group;
    -- that means only one row per subject in this table.
    -- So subject can be our primary key.
    subject VARCHAR(255) NOT NULL,
    expgroup VARCHAR(50),
        -- Avoid using the name 'group' as it is an SQL
        -- keyword. We will store words like 'sham' and 'lesion'.
    exclude BOOLEAN,
        -- In case we want to remove all data for a subject.
    PRIMARY KEY (subject)
);

CREATE TABLE drug_session (
    -- This table tells us which subjects had what drug/dose on which day.
    drug_session_id INTEGER NOT NULL AUTO_INCREMENT,
    session_id INTEGER NOT NULL,
    drug VARCHAR(50),  -- Maybe 'amphetamine_0_3', 'amphetamine_1_0'.
    PRIMARY KEY (drug_session_id),
    FOREIGN KEY (session_id) REFERENCES session(session_id)
        -- The session_id field will refer to session.session_id; this
        -- prevents us from creating drug information for non-existent
        -- sessions, etc.
);

-- Then, after inserting some data, we could fetch all trial
-- information and bring in matching lesion/drug details with this query:

SELECT
    L.subject,
    L.expgroup,
    D.drugsession,
    T.*
FROM
    lesion L
    INNER JOIN config C ON L.subject = C.subject
    INNER JOIN session S ON S.config_id = C.config_id
    INNER JOIN drug_session D ON D.session_id = S.session_id
    INNER JOIN trial T ON T.session_id = S.session_id
WHERE
    NOT L.exclude
;
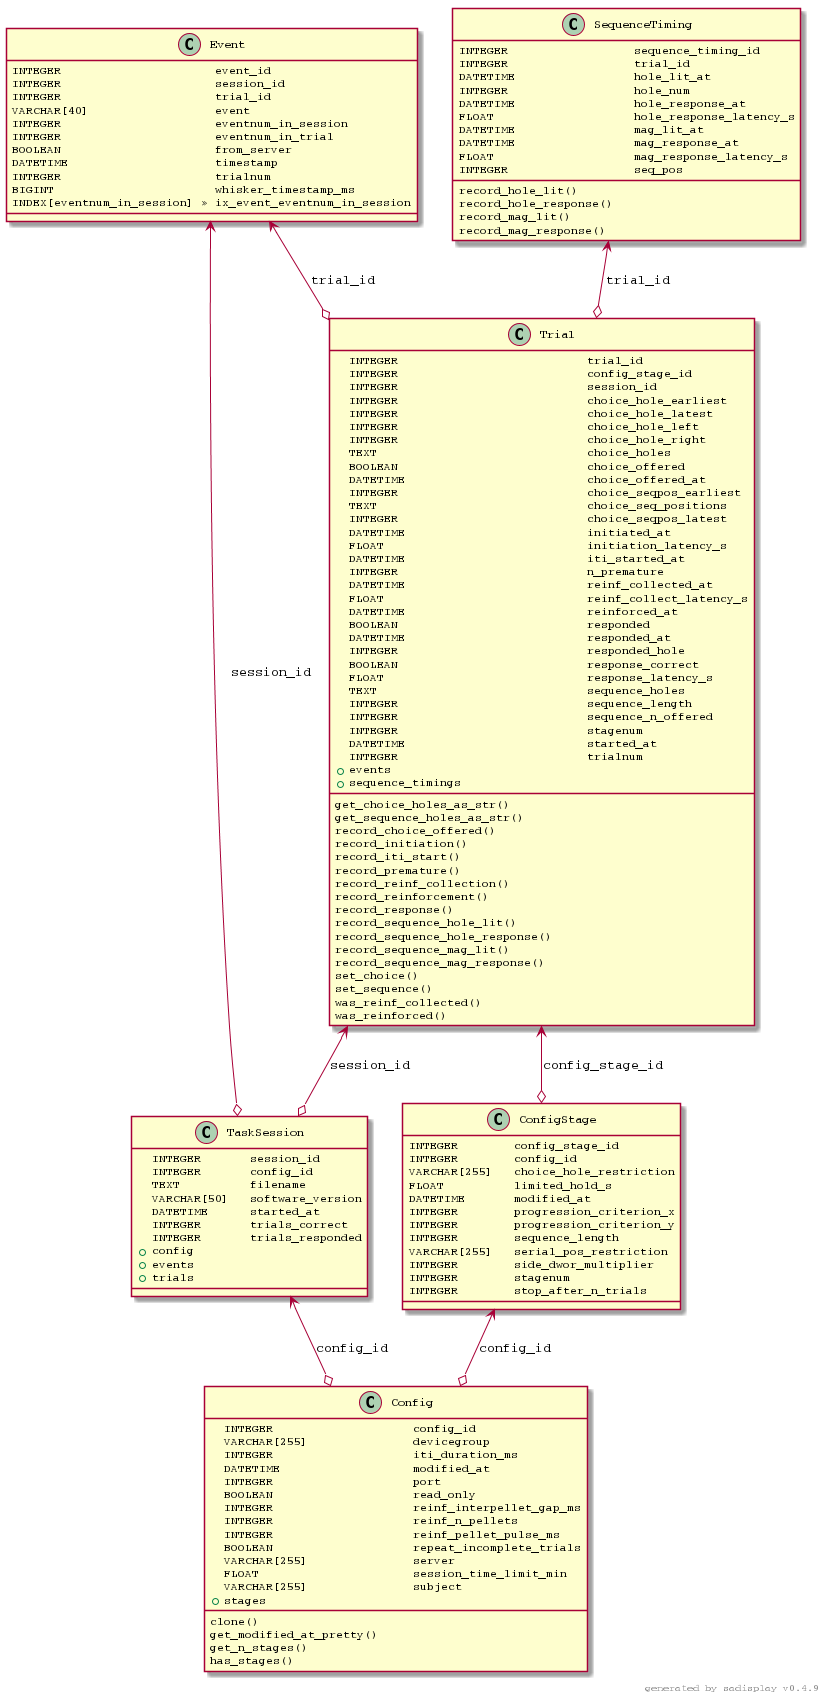
Schema
Try whisker_serial_order --help to see a few other things it can do. If you
have Java and the PlantUML .jar file (http://plantuml.com/), you can use the
--schema option to generate a schema picture of the database, shown below.
Footnotes